Digital Design Process: Drive Successful Outcomes

Here are the proven steps we take to get a digital product from kickoff to launch and through to growth and optimization.
“What’s your process? What makes you different/better? Why should we work with ExpandTheRoom over others?” These are the questions that new clients often ask us, so we thought others may find value in our answers too.
These sound like simple questions but often the answer is fairly complicated. Defining a repeatable product design process that leads to success, one you can put down on paper, is the Achilles heel of many agencies. At ETR we have worked diligently over the past few years to define, redefine, and hone our process into one that gracefully takes our clients from the, “I don’t even know where to begin” phase to launch and right into post-launch optimization—a process that many find is impossible to achieve.
In this article we want to give you a birds-eye-view of our entire design process. We won’t go too deep into the weeds on any given step (we have other articles that do that), this is more of an overview of what each step entails and what to expect. Remember, every project is unique. Therefore, we’ve designed our process to be malleable. Steps can be shortened or skipped altogether depending on the project goals, timeline, and budget. However, for the purposes of this article, we’ll share all the steps. Following our design process will help you get any digital product project, large or small, across the finish line on time and on budget.
When we use the term “digital products”, we are referring to anything that has a digital interface. This includes websites, apps, and interactive touchscreens.
Four Phases
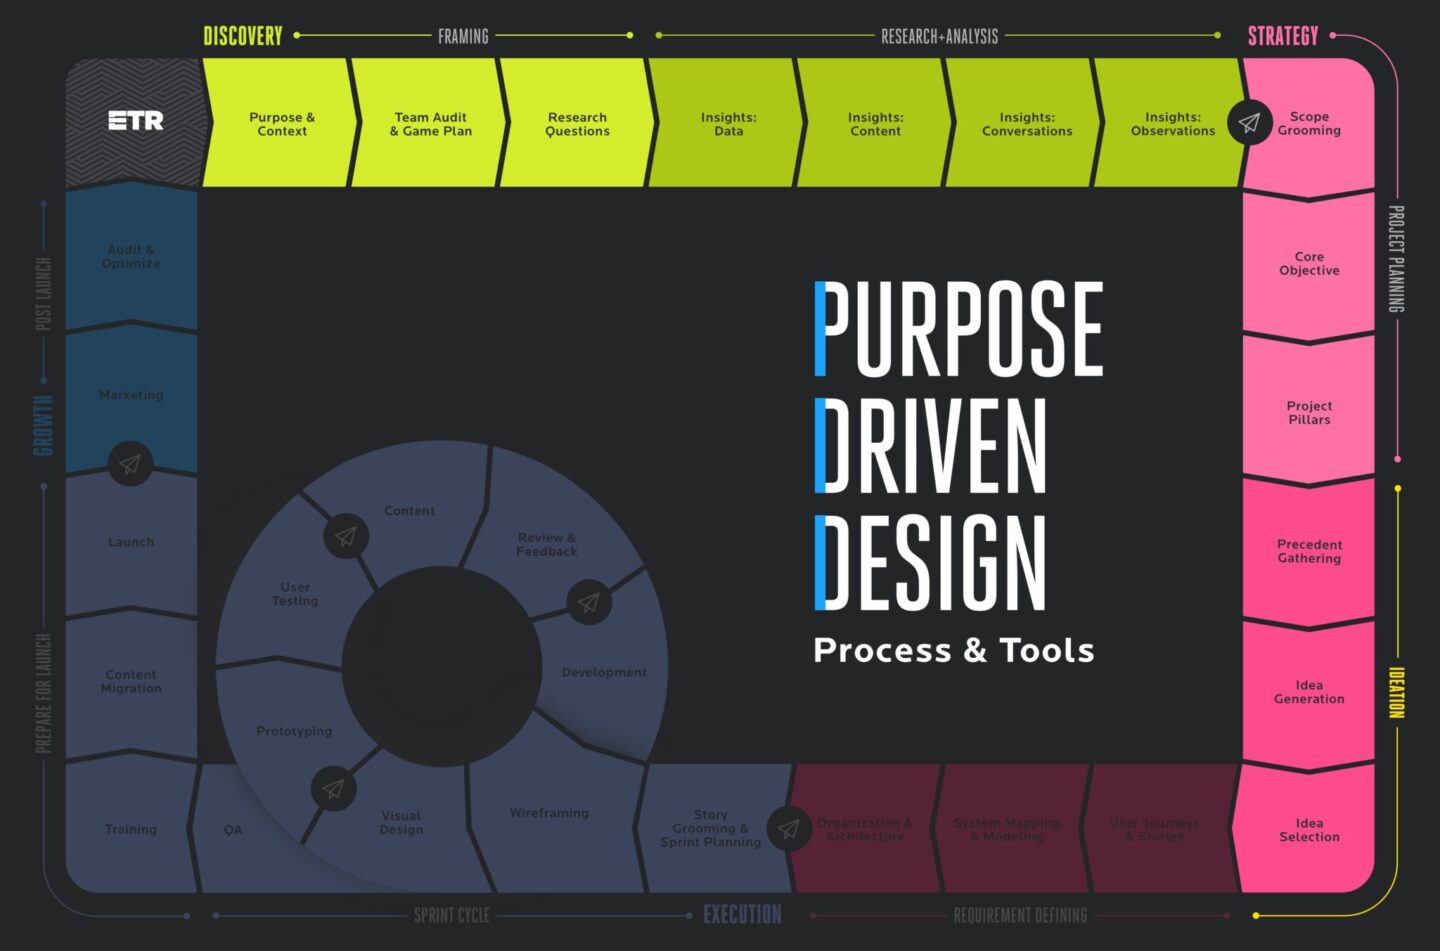
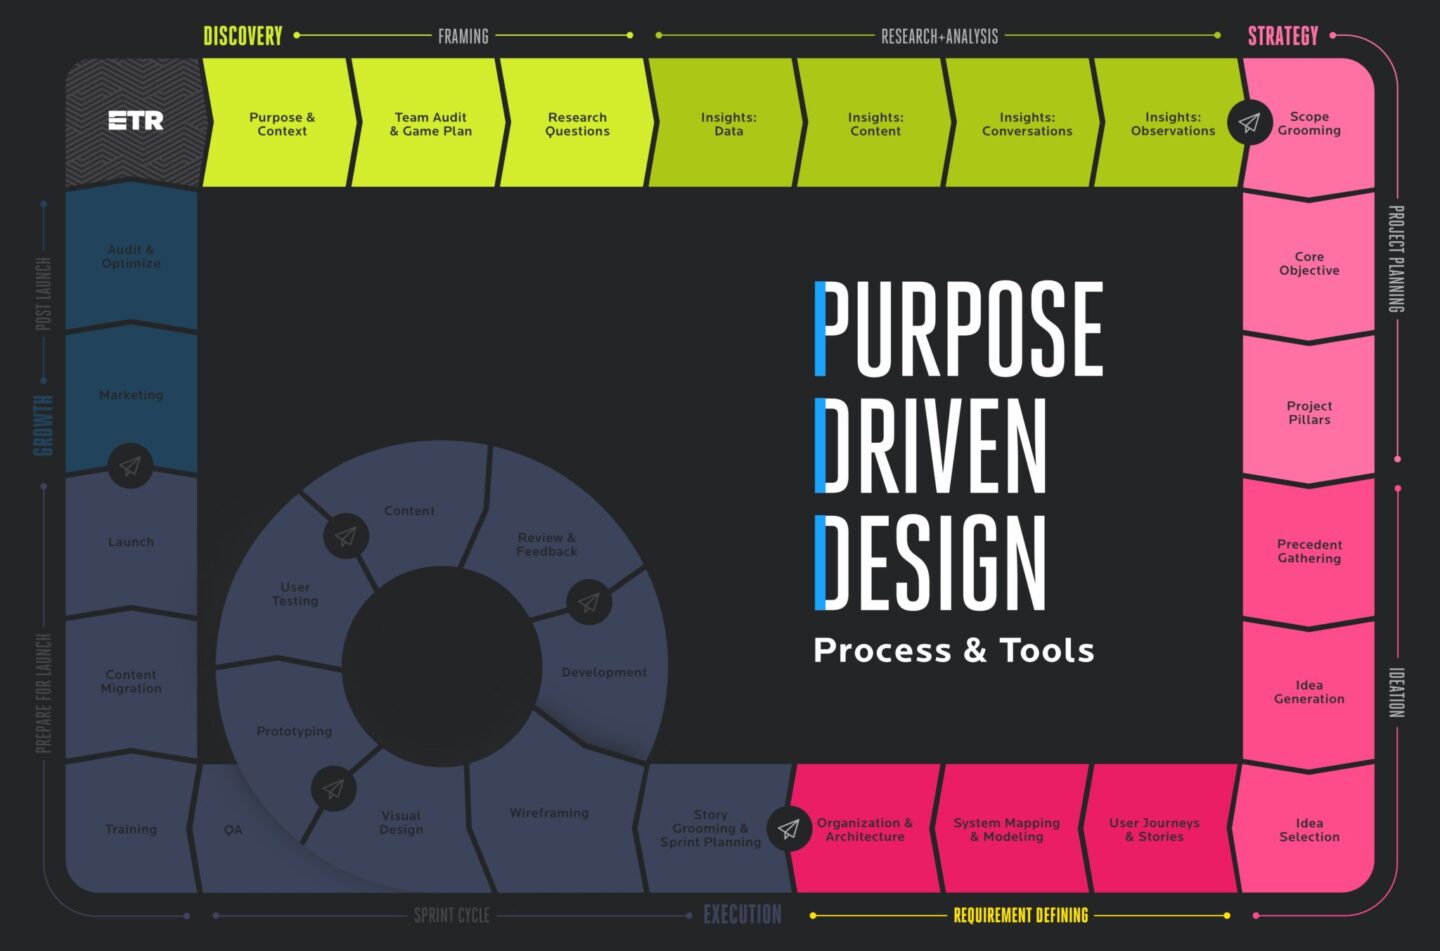
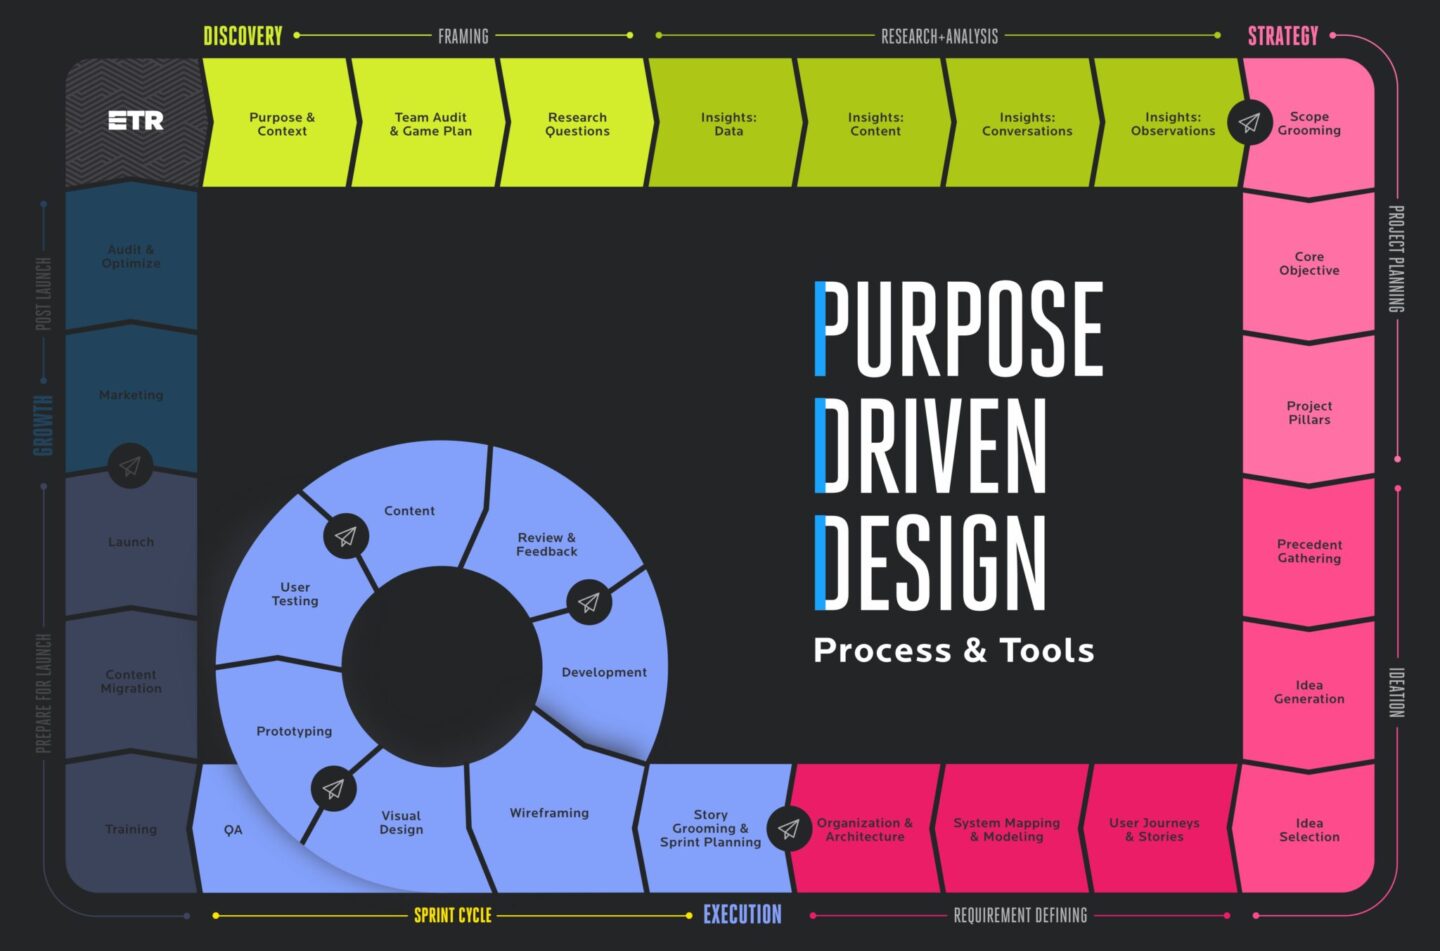
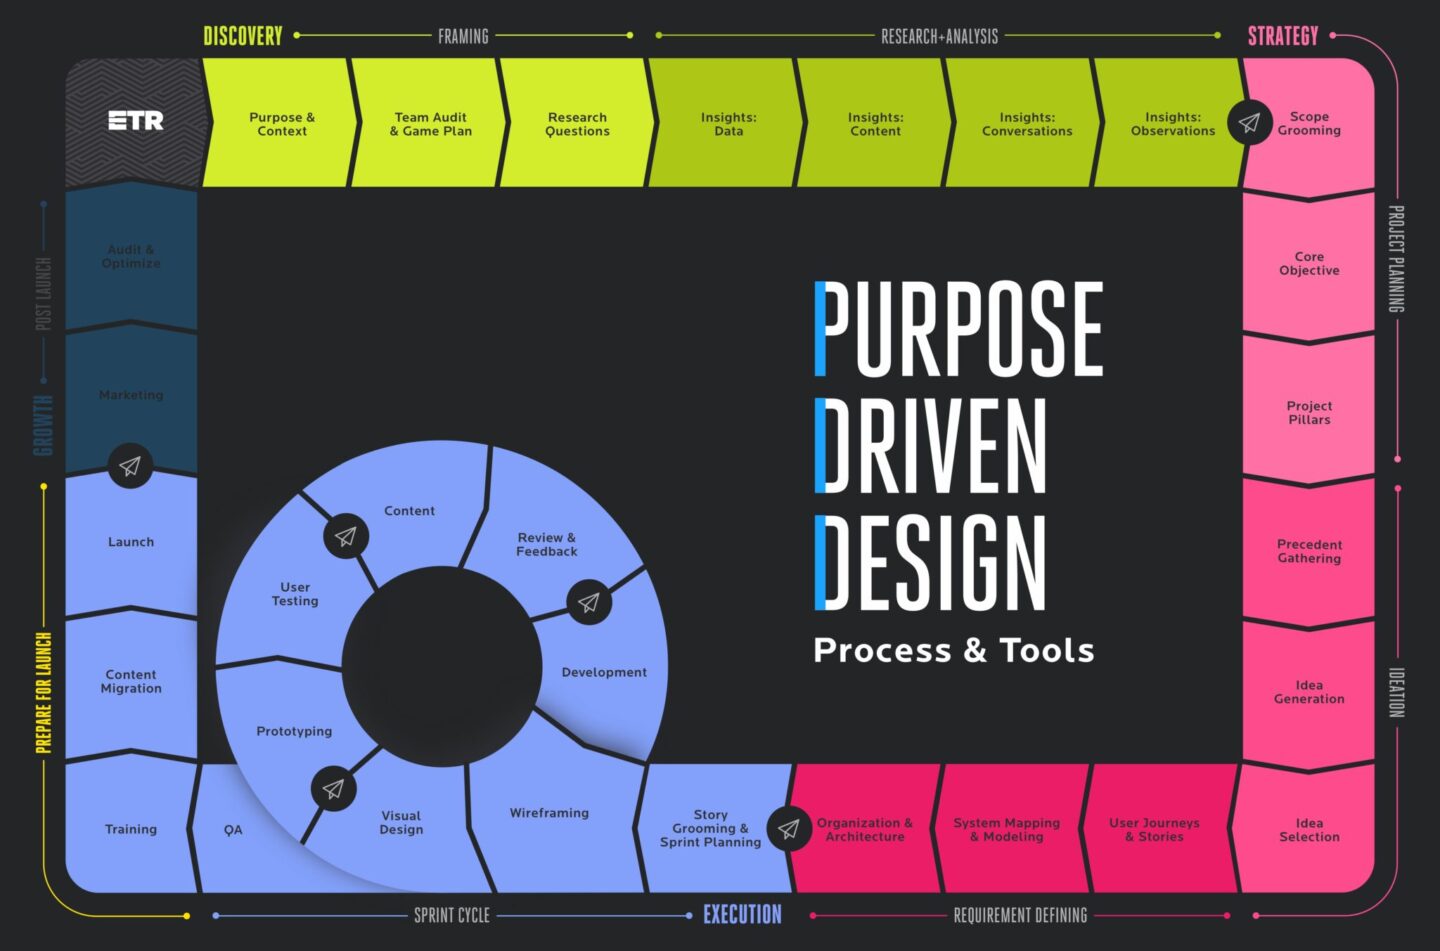
Our digital product design process is broken down into four main phases: Discovery, Strategy, Execution, and Growth. The steps within each phase along with Purpose-Driven Design, our design philosophy and framework we use to solve problems, lead us through every project.
We created this handy roadmap to help guide our clients through the design process steps (Download a PDF of our Process Map):
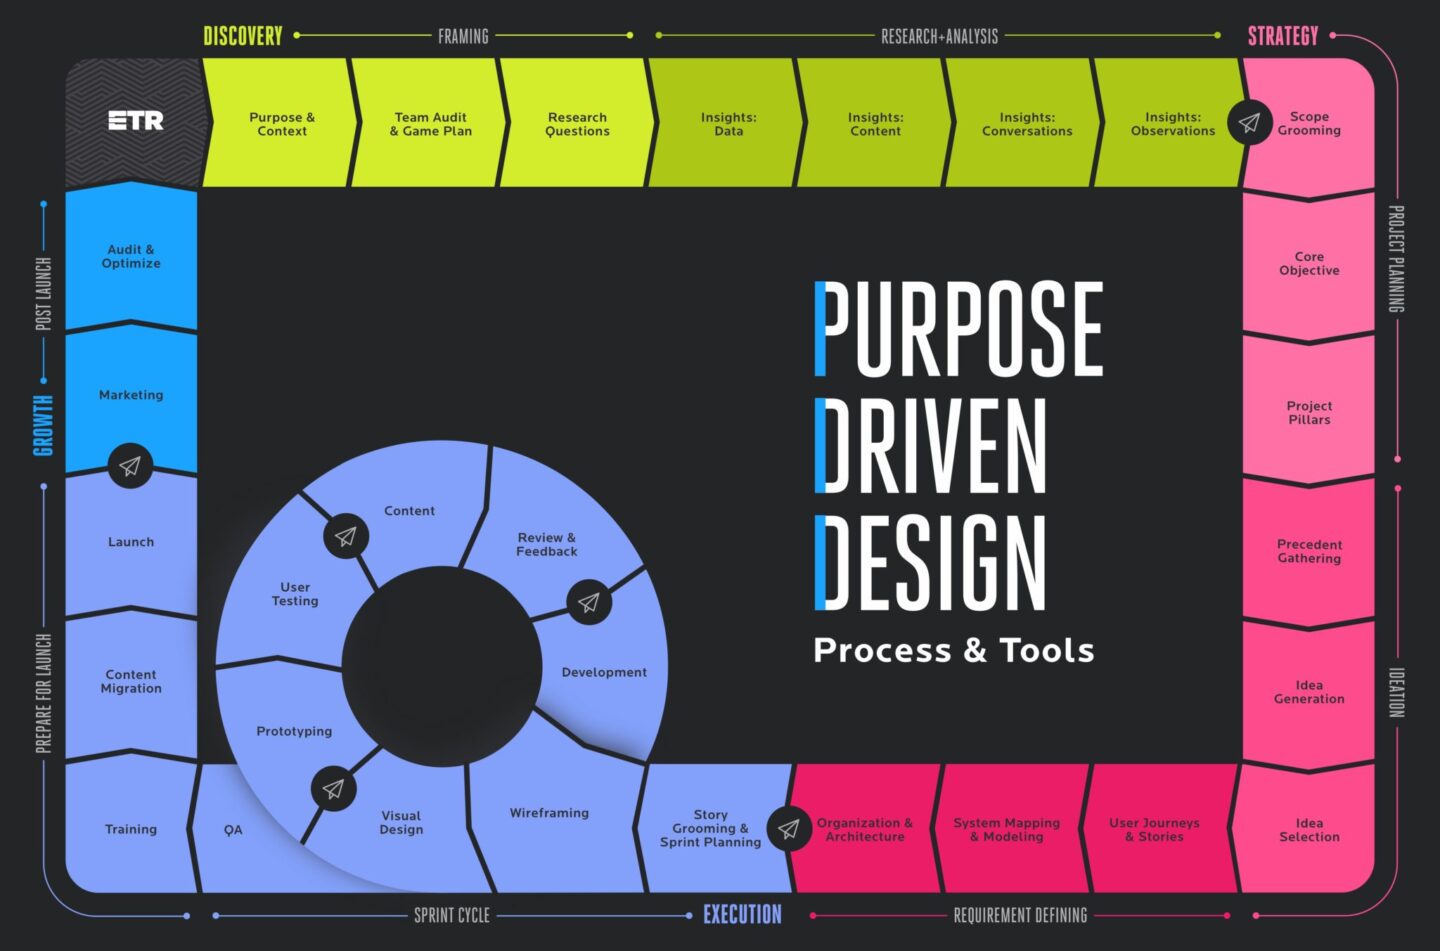
Let’s dig in.
Discovery
This phase is all about getting to know you, your business, and your customers. We want to understand your processes, aspirations and business goals, as well as learn about your current pain points and roadblocks. Ideally, we’ll spend time with your key stakeholders, your customers, and learn your users’ behaviors and patterns. We want to learn as much as we can about your current product and business. There are seven steps we cover in our Discovery phase.
FRAMING
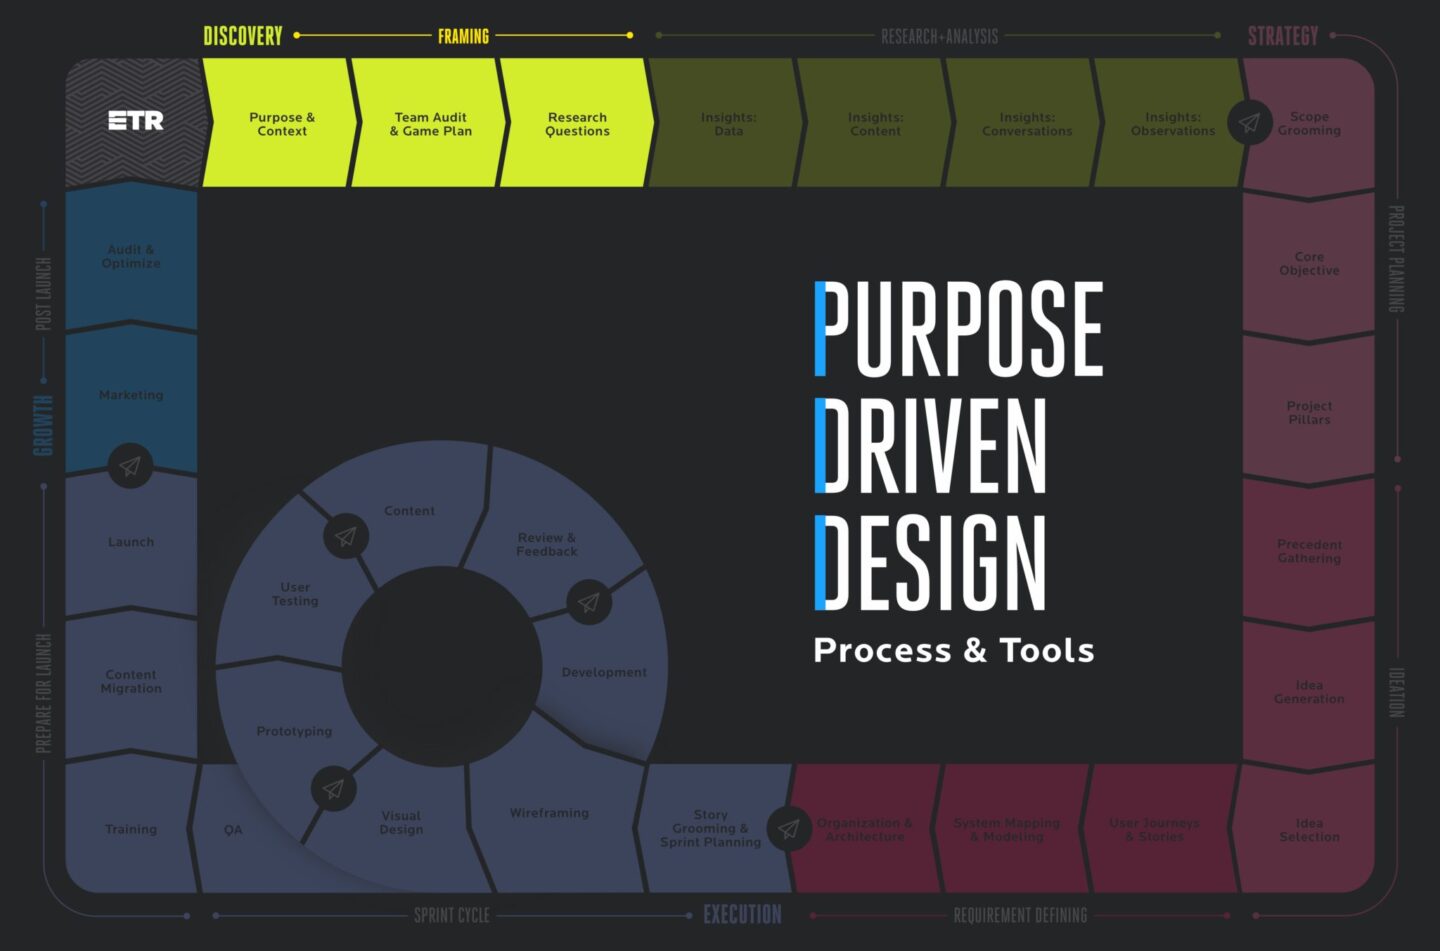
1. Getting to know you (Purpose and Context)
We start with our Context and Framing exercise. This is a worksheet we fill out together to get a full scope of where things are with the business today including values, goals, differentiators, competitors, contributors, roadblocks, metrics of success, etc. This critical document sets the foundation for what we focus on as we move through the design process. For a deeper dive, check out our article How to Kick Off a Web Design Project Using ETR’s Proven Method.
2. Meet the team and come up with a plan (Team Audit & Game Plan)
Not only is it crucial to understand your company and its goals, it’s also important to get to know the people we’ll be collaborating with, and equally important for you to get to know our team too. We’ll be working together for quite a while and doing meaningful work together, let’s make it as successful as possible and enjoy the process! Our Team Audit Worksheet allows everyone on the team to communicate their workstyle, personal and project goals, schedule needs, strengths, weaknesses, etc. Additionally, the Game Plan Worksheet allows the team to set some common team goals, rules, and norms and track those against the understood timeline and budget. This step is all about clarity, team building, and agreeing on reasonable expectations.
3. Figure out what we know and don’t know (Research Questions)
Before we start doing research, we need to figure out what questions we need to answer. This means we need to identify both what we know (so we can validate it) and what we don’t know (so we can ask about it). Of course, there will always be things that come up during the discovery process that we don’t know we don’t know. The types of questions we have to answer influence the research approach we take to get the answers. Our Research Questionnaire helps us figure out the right questions to ask. For a more detailed look into writing questions check out our article How to Write Effective Product Research Questions.
RESEARCH & ANALYSIS
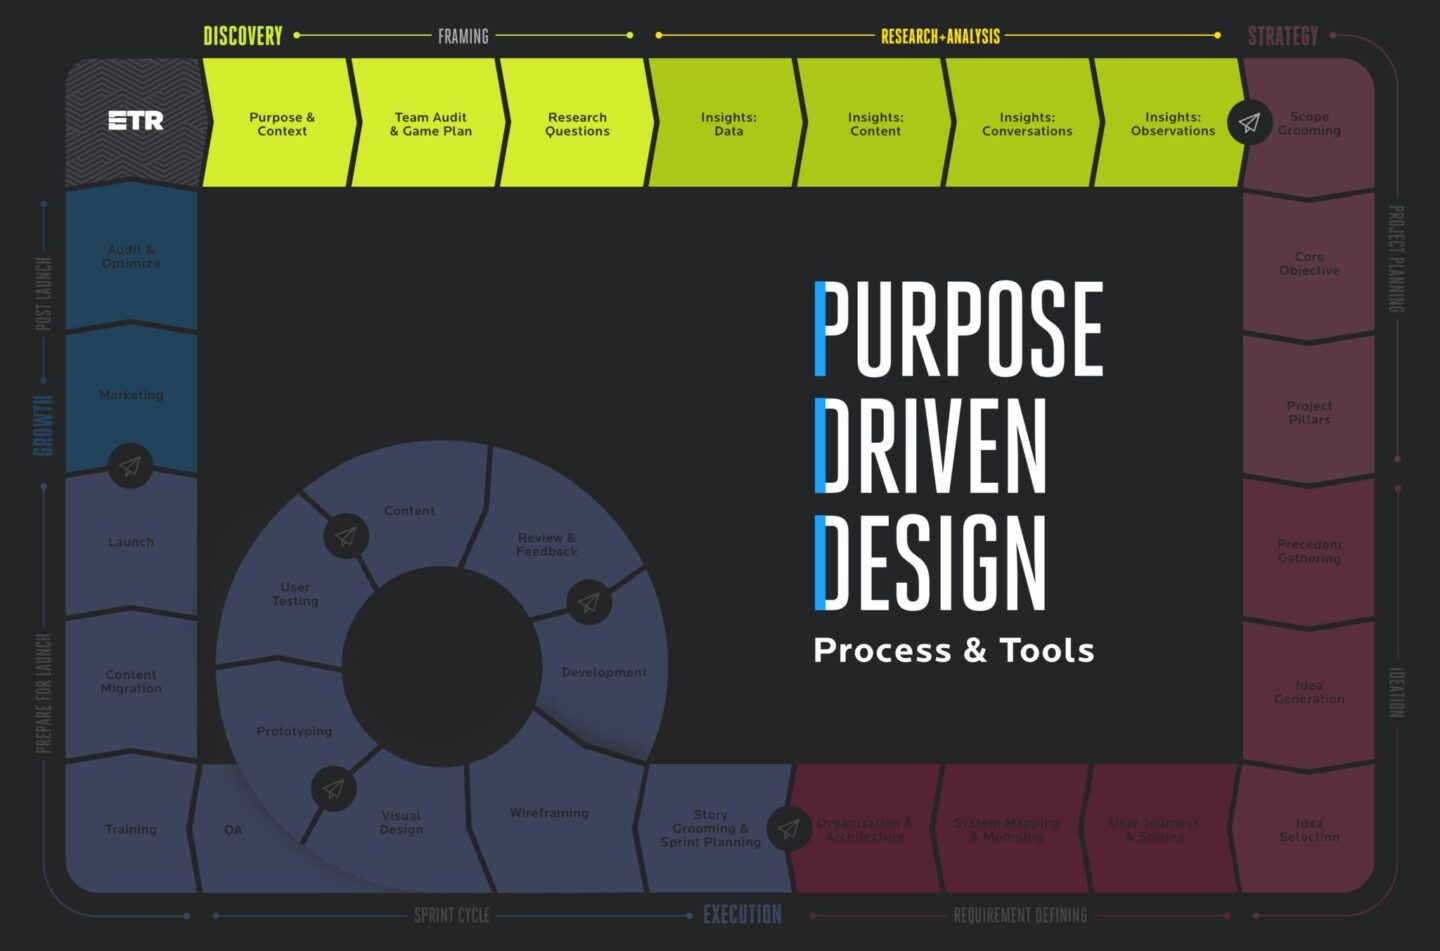
4. Look at the current data (Insights: Data)
In this context, data refers to all the quantitative information we can gather about your current product including visual elements, software, APIs, plugins, and analytics. It’s crucial to inventory the current situation to have a clear picture of everything that exists today so we know exactly what we are starting with.
On the visual side, many products fall victim to bloated UI elements, colors, and type styles that come from years of redesigning and expanding without having a proper style guide or design system to keep things consistent. A UI inventory is our opportunity to survey the visual landscape and gather all the styles that are in existence, with the goal of pruning the excess and defining the right properties for the future product.
Similar to visual elements becoming bloated over time it’s common for software integrations, APIs, or plugins to increase as new needs or requirements arise. It’s important to get a complete understanding of all the tools that are needed to perform daily operations so nothing is lost and for the exploration of simpler or automated solutions.
It’s also important to review your existing analytics set up and make sure it’s set up properly to collect accurate and meaningful data. If it’s not, we will work with you to set that up. This is an important step in the design process because it gives us baseline data to compare a new product design against to evaluate its impact.
5. Gather and review all the content (Insights: Content)
A content inventory is a process of cataloging all the content that exists within your product today. Gathering what types, amounts, and the metadata is a crucial step in the design process when it comes to reorganizing the content later. We typically start by crawling the site using a tool like ScreamingFrog to get a list of all page URLs. Sometimes we need to supplement that crawl data with additional details if we want to inventory content types at a more granular component level vs the page level.
A content audit follows the content inventory. Once we’ve inventoried all the content and have an understanding of what we’re dealing with, we analyze that content and evaluate it based on what is performing well vs. poorly and identify critical content gaps that exist. Said simply, we help you decide which content you want to kill, keep, or (re)create. Our Content Audit Template helps us organize our findings. If we need to take a really deep dive and find content that no longer aligns with your business goals our Content Gap Map can help organize content by user type. For more details, you can check out our video on Content Strategy 101.
An SEO audit allows us to see where things stand from the world of search. It gives us insight into which content is performing particularly well from a search perspective and where any technical issues exist that might be impacting your content’s visibility to search engines. Check out our video on SEO 101. The SEO data is then cross-referenced with the analytics data. If there are pages that are performing exceedingly well, we look to elevate that content even more and learn from the data when structuring new pages and content.
6. Talk to people and ask questions (Insights: Conversations)
There is really no substitute for talking to real users. We define users as anyone who interacts with the product including stakeholders, internal staff, and end users. Generally, we find we need to interview at least 5 people per unique user type to get meaningful insights. Interviews are typically 30 minutes to an hour. Our Interview Guide Template helps us come up with the right questions to ask each person based on these four key areas: Facts, Objectives, Emotions, and Ideas. We also leverage the previous work we did coming up with research questions to make sure we are covering the right areas. Surveys are another successful tool we use. They can be used in conjunction with or as an alternative to interviews. Depending on the project and data we’re looking to discover we deploy the right mix of tools.
7. Review the current product and competitors (Insights: Observations)
Here we analyze specific pieces of your product in relation to your competitors.
To evaluate the current usability we perform a heuristic evaluation. This can be an incredibly useful tool at exposing issues around things like navigation, wayfinding, brand consistency, information design, and accessibility. Often these different areas are scored from 0 (does not work) to 4 (excellent) and allows us to understand where to focus and what critical areas need the most improvement. Our Usability Checklist breaks down the areas we review and score.
Through this process, it’s important to understand what your competitors are doing well and what they need to work on so you can gain an advantage in both places. Things such as usability, site metrics, and tone are all things we take into consideration. Our Competitive Analysis Template helps us rate you and the competitor on different criteria.
DISCOVERY PHASE FINAL DELIVERABLE
The wrap-up to the Discovery phase results in a Discovery Findings Report. Here we provide a read-out of all of our key findings including implications, recommendations, and suggested direction for the next steps.
TIME CHECK
As mentioned above every project is unique and not every project requires every step in this design process. Some steps will happen faster or slower depending on the project size and complexity. Discovery phases range from two to eight+ weeks (depending on several different factors).
Strategy
The Strategy phase is all about gathering the requirements for what we are making, who we are making it for, and what it will look like when it’s done. Building on the consensus coming out of the Discovery phase we can now begin honing our core strategy, look & feel, content organization, and requirements. There are nine steps we follow through the Strategy phase.
PROJECT PLANNING
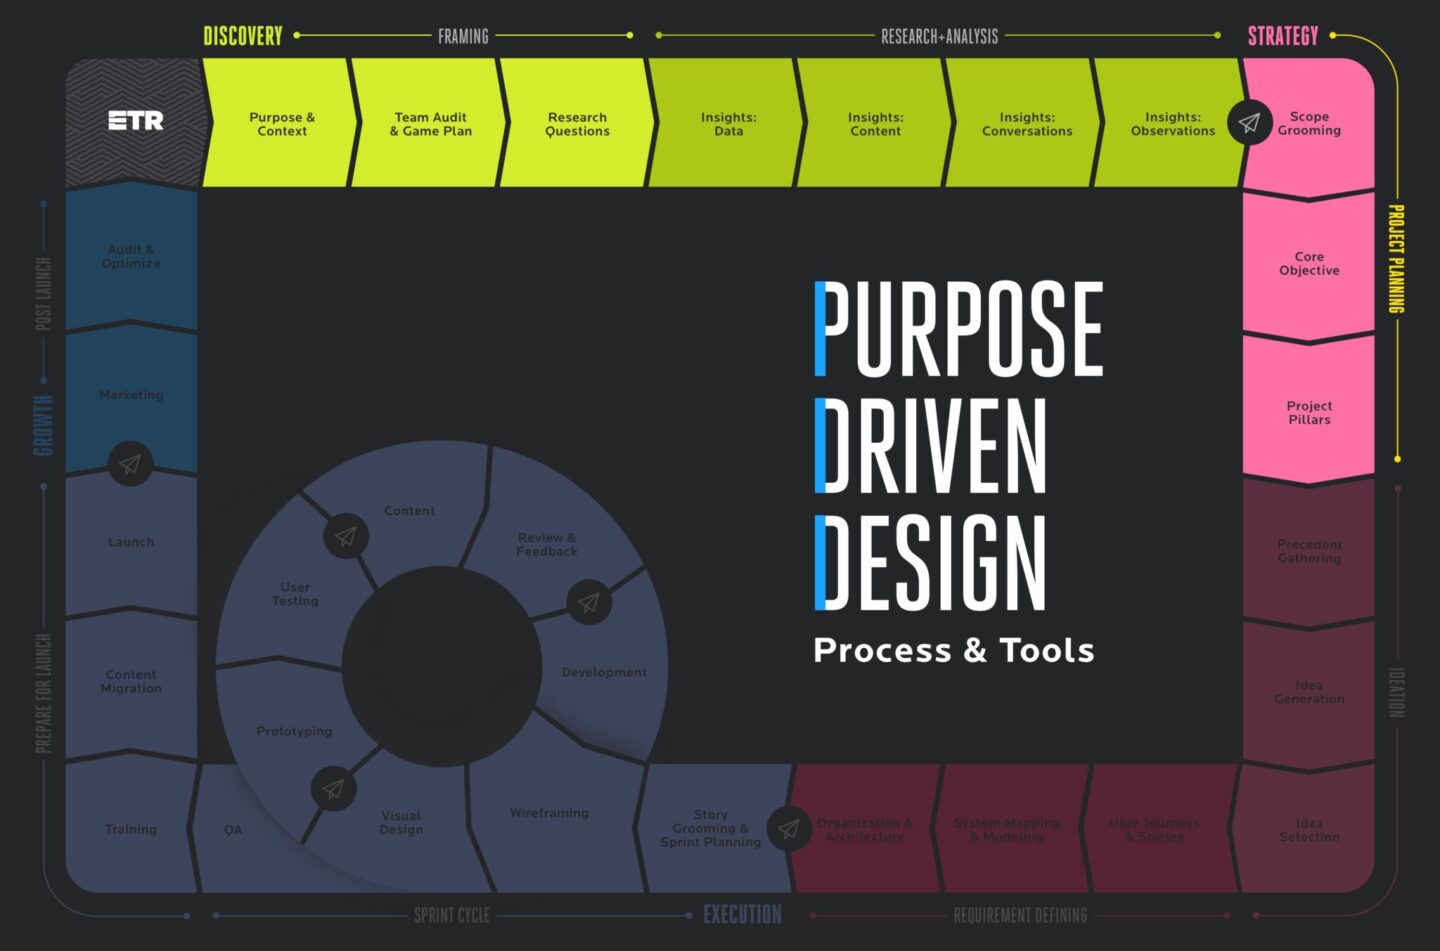
1. What do we actually need to create (Scope Grooming)
The goal of the Discovery phase is to learn and validate. Perhaps what we originally thought this project was going to be needs to shift a bit. Maybe the problems we thought we had are not the real ones we need to solve and we discovered new ones through the process. Our Deliverable Gut Check Exercise helps us evaluate and quickly hone in on what the right deliverables will likely be for the project. From there, we fine-tune the project’s scope to make sure we’re putting the most effort into the features that will create the largest impact for your business (i.e. getting you the biggest bang for your buck).
2. Define the project goal (Core Objective)
Here we define the foundation of the entire project. The core objective often comes in two flavors: the core content strategy statement and a central design challenge. The core content strategy statement describes the overall content strategy. This statement will define everything you are working toward from a content perspective. Put it on a poster and hang it in your office. Make sure everyone can see it. Then, print another poster with the central design challenge. This is a concise, research-informed statement that defines what we are building and for whom. It is often structured like this: How might we verb to objective for users. Success comes when we accomplish this challenge. Our Central Design Challenge Worksheet helps us distill our findings down to our core statements.
3. Define the high-level requirements (Project Pillars)
With the foundation laid we need to define the pillars that will support the rest of the project. These come in two flavors: design requirements and content requirements. Our Design Requirement Canvas helps us brainstorm across a variety of areas then allows us to narrow them down (diverge and then converge). Design and content requirements are high-level criteria that every design and content decision must meet. These requirements help keep designs on track and aligned with research findings. One of the primary benefits of this step is to remove subjectivity as we move further through the design process. Our decisions aren’t based solely on opinion but rather on agreed-upon requirements and facts.
IDEATION
4. Find great design examples in the wild (Precedent Gathering)
At this stage of the project, we are starting to explore the actual look and feel. With a solid understanding of our design requirements, we can use the Lotus Blossom Exercise to gather relevant examples of good design out in the wild that we can learn from. It is often not necessary to reinvent the wheel when solid, best practice solutions are in existence. We take these examples and figure out how they can work best for our needs. Mood boards and art direction inventory begin to help us define our style. Mood boards are a collection of photography, text, colors, or patterns that can help define tone and overall style direction. An art direction inventory is a collection of websites grouped by a common theme that can help us define direction using real-world examples. We use all three of these tools together to begin exploring a new look and feel.
5. Come up with a ton of ideas
(Idea Generation)There are many different activities that can be used to spark creativity and generate ideas. Entire books have been written on this topic. Ideas can come from a lot of places but two exercises we like are the innovation mashup and sketching studio. Innovation mashup comes directly from the good folks at Hyper Island. This is a great exercise for coming up with innovative ideas by combining two or more elements from things found in the wild. Sketching studio can be a great exercise for discovering new ways to organize layouts, particularly for products. When you get key stakeholders and users in the room and ask them to draw their ideal dashboard, for example, you can discover a lot of novel ideas (that often turn out to be obvious after that fact).
6. Pick the best most feasible ideas (Idea Selection)
Coming up with blue sky ideas during the idea generation phase is the fun part. Now it’s time to narrow those ideas and decide which are the best to execute on. The Effort/Impact Matrix is a great tool for weighing each idea against feasibility and impact. We really want to focus our energy on those ideas that are differentiators, have the greatest impact, and can actually be done on time and within budget. Art direction attributes are a set of design concepts that also come together during this phase. These attributes are often a set of “feeling” words that describe the product. What do you want users to feel when they use your product? Words like comforting, simple, fresh, modern, secure, trustworthy, etc. are ones that often surface. The mood boards and art direction inventory from the previous step help us collaborate with you and define the attributes that are best for your brand.
REQUIREMENT DEFINING
7. Define how customers use our product (User Journeys & Stories)
User stories help us understand how a user expects to interact with a system and how they expect it to respond. A basic login screen, for example, is a pretty known user story that explains what a user will need to do: enter user name and password, retrieve a lost password, create an account, etc. Each stop on that journey has a set of requirements we must log. Our User Journey Template and Storyboard Template are two tools we’ve used to map out and organize user stories. Well written user stories help ensure we don’t miss any steps along the way, resulting in a seamless user experience for your customers. User stories with acceptance criteria also help us QA the final product once it’s ready.
8. Define how content works together or alone (System Mapping & Modeling)
There is often a lot of content within a product that applies to many pages. Consider product features on a retail site. Some product features may apply to many or all products while some may be exclusive to just one. Mapping content and the taxonomy of how things are organized can save hours of time when it comes to managing and updating your product in the future and helps ensure content is linked correctly. This detailed level of organization is done with the goal of giving you time back in your day and allowing you to easily and quickly update your product in one place.
9. Organize the content and pages (Organization & Architecture)
Activities such as a card sort or tree testing are great ways to discover how users intuitively think things should be organized. In these tests we ask questions such as “where would you expect to find XYZ?” And “after you do this, what would you expect to do next?” The results can be surprising and may not be what you expected (or wanted). With this information, we can begin finalizing a sitemap, a standard piece of information architecture needed for any product. A well organized and intuitive sitemap is a crucial component to ensuring a positive user experience with your product.
STRATEGY PHASE FINAL DELIVERABLES
The wrap-up to the Strategy phase of our design process is essentially the blueprints you need to build the proverbial house: creative direction, content strategy, a detailed set of functional requirements, and the sitewide architecture. Creative direction is the culmination of the first six steps of the definition phase. At ETR we describe creative direction as the overall vision we have for a project: what we are designing, who we are designing it for, how we will design it, the requirements required for its success, and how it will look and feel. A content strategy takes the learnings from the content inventory and audit and “plans for the creation, publication, and governance of useful, usable content,” as defined by Kristina Halvorson, author of Content Strategy for the Web and CEO and Founder of Brain Traffic. Functional requirements are a detailed list of everything we will build and the criteria it must meet for success. Sitewide architecture is how those items will be organized.
TIME CHECK
As mentioned above every project is unique and not every project requires every step in this design process. Some steps will happen faster or slower depending on the project size. The Strategy phase can range from three to eight+ weeks.
Execution
Alright already, let’s start making some things! At this point, we have a rock-solid foundation of what we are building, the objective, the requirements, how it will look and feel, and how it will be organized. It’s time to start bringing it all together in the Execution phase in the form of wireframes, copywriting, and high-fidelity designs that will become the fully functioning product you came to ETR to create. This is often a twelve-step sprint process based on rapid prototyping and quick iteration.
1. Story Grooming & Sprint Planning
Based on the requirements we plan a sprint schedule to determine the order in which we will tackle each problem. Story grooming is the task of reading through each requirement and making sure everything is accounted for. Did any steps get missed, are there any edge-cases that are crucial to consider? In sprint planning, we break down the entire project into manageable chunks, usually 2-3 weeks in length, which may include wireframing, content planning, design, prototyping, and development. The composition of the sprint changes as the project evolves.
SPRINT CYCLE
2. Wireframing
Wireframes sketch out the structure for each page of the product—like a blueprint. The goal of making wireframes is to figure out the optimal organization and hierarchy of content on each page and identify the right UI elements so the page can accomplish its purpose (as defined by the requirements). It’s much faster to iterate through wireframes vs final designs.
3. Visual Design
Most teams really enjoy the visual design phase of the design process, where wireframes start coming to life as high-fidelity comps. Informed by our creative direction, we first align on our art direction which includes, but is not limited to, colors, typography, image or illustration treatment, and UI. Once art direction has been approved, we iterate through a design approach that applies this direction, testing how everything comes together under one roof. With agreement on the big picture of this newly applied art direction, we evolve it into a comprehensive digital style guide that is used to design the remaining components and pages. This can come in the form of static comps using Sketch or Photoshop or any other number of design programs. We can add motion and prototyping using tools such as Invision, Framer, or Proto.io.
4. Prototyping
Prototyping can happen during the wireframe or design phase, or both. There are many tools for prototyping—we often use Invision. A clickable prototype allows you to get a sense of how it will feel to interact with your product and to start collecting data as you quickly test your solution with stakeholders and/or real users to make sure it’s logical and nothing has been left out.
5. Usability Testing
One of the most critical steps in any design process is usability testing. We need to validate that the product design we’ve created based on research works for users in the real world. For usability testing we recruit participants who meet the target demographic of the product and have them complete a series of tasks or questions, observing the outcomes. Usability tests can be moderated or unmoderated depending on the complexity of the product and tasks and we often run a mix of different tests to gather both qualitative and quantitative results.
6. Content
An often underestimated challenge when it comes to launching any product is the writing or rewriting of content and microcopy. One key area where we can help with copywriting is a voice and tone guideline. This document helps define the tone, approach, and length of the various types of content used in a website or product. Wireframes and designed comps are also great ways of understanding your content needs. Our Content Templates are a paragraph-level companion to a wireframe and detail how the content should appear on a page. For example, it would break down the layouts into heading one, sub-header, intro-text, paragraph text, heading two, etc. whereas a traditional wireframe would just show a block of text. They are a great tool that help subject matter experts explain the information they need, to the people who will actually be responsible for creating the content. Copywriting is an area that may require additional time and attention if big changes are being made or the voice and tone of the brand is being created, so it’s important to plan the schedule accordingly.
7. Review and Feedback
We spend the necessary time reviewing designs and discussing feedback with key stakeholders before gaining alignment and moving forward. We often find that the more robust the discovery process is the more smoothly these review sessions go. Nothing should be a surprise or based on pure subjectivity. Decisions are based on research and data and vetted through testing.
8. Development
Armed with approved designs and functional requirements, the project moves to the development team. We take a technology-agnostic view and challenge ourselves to use the right tools to most efficiently and effectively accomplish the tasks at hand. Most of the development planning occurs in earlier phases of the project, which means our coders are already familiar with the project when it hits their desk. This early collaboration between design and development is a critical part of our process as it helps build knowledge, consensus, and accountability throughout the team. It also helps reduce late-breaking surprises.
Note: most clients prefer a hybrid approach but we’re happy to run a proper Agile process if a client understands the process and would like to work that way.
9. QA
Quality assurance is the process of reviewing the final product and checking for bugs or anything that may not match what was approved in the Define and or Design phases. Generally, this is best done as a collaboration between the ETR team and the client stakeholders. Occasionally, if meritted, we’ll bring in a dedicated third-party team to take an even deeper review. This includes the frontend (what the end user sees) as well as a backend (code and CMS) to ensure everything was implemented as expected.
PREPARE FOR LAUNCH
10. Training
When our work is complete, our goal is to leave you with a great product and the training you need to maintain and evolve it into the future. Client teams are all different in terms of their internal skills and their desire to fully maintain the product or engage us to maintain it for them. Therefore, early in our design process, we work with you to understand what your ideal approach is and then construct a training plan to accomplish your goals. We then work closely with clients during the QA phase to properly train all key users in accordance with that plan.
11. Content Migration
When evolving or redesigning an existing product, content migration can be a mountain of work (one that is often overlooked). Regardless if the plan is to programmatically bring the content over (if reasonably possible) or manually transfer the content, a solid strategy needs to be defined early in the design process. Manual content migration often happens on the client side or can be a shared effort between ETR and client. As part of the process of moving the content, there are also SEO implications that should be considered as part of this transfer.
12. Launch
After all bugs have been squashed, integrations tested and the final content is uploaded, it’s time to hit the launch button, pop some champagne, and celebrate a job hard-fought and well done!
EXECUTION PHASE FINAL DELIVERABLE
The final result, of course, is a brand new product that ETR and our client partner are proud of. One that serves the end user well and does exactly what we had planned it to do.
TIME CHECK
More than any other phase, the Execution phase can range in time significantly depending on what exactly we’re making. We’ve had execution phases last one month and others that have lasted for two+ years.
Growth
Okay, we launched a great product together, now let’s make it better. In this phase, we look at ways to improve and evolve the product and help market it to grow your audience, increase conversion, and ultimately improve your overall ROI.
POST LAUNCH

1. Marketing
Marketing is usually an important leg of most businesses and something we’re thinking about from the beginning of our design process. During discovery, we aim to learn what works for your company, what your expectations are for marketing, and what future marketing activities you plan on doing. We create buyer personas, customer journey maps, and product message frameworks. We build on those findings in Execution and help you craft a marketing strategy to achieve your goals. Then, when the time is right, we put that strategy in action.
2. Audit & Optimization
Whenever it makes sense, meaning we are still able to add value, we like to stay involved with you and your product post-launch. After you have a decent amount of customer usage (usually about three months) we like to audit performance and engagement and look for opportunities to improve the product based on that data. We look to identify trends, both good and bad, understand them, and then adapt and evolve the product to address them.
GROWTH PHASE FINAL DELIVERABLE
In no particular order, these are the kind of things we do and deliver during the Growth phase.
- Paid search management
- Paid social management
- Inbound (content) marketing strategy creation and refinement
- Topic research
- On-page SEO optimization and training
- Technical SEO audit and assisting with fixing errors
- Topic research
- Digital measurement strategy and execution
- Conversion rate optimization
- New feature releases
- A/B and focus testing
TIME CHECK
Every project is unique but in general, we’ll start some activities alongside the launch of a product and then continuously evolve those activities over time. It’s not uncommon for our growth engagements to last several years.
Alright, that’s it. Easy, right?
Are you wanting to create something great? Hit us up. ETR is always excited to meet good fit clients who value quality, research-driven strategies, and digital products that build loyalty and drive conversion.
More Insights
Six Design Trends You Will See in 2024
In the field of design, trends come and go. As technologies evolve and user preferences shift, design trends naturally progress and adapt. Keeping up with the latest trends helps brands stay current and resonate more with consumers as their preferences evolve. Last year, we highlighted dynamic color, personalization, and simplicity. In 2024, we envision designers

‘Tis the Season to Commit to Exceptional Experiences: UX Resolutions for 2024
With December upon us, our thoughts turn to resolutions—the ways we can be better in the year to come. For us as an agency, that means constantly raising the bar for ourselves, our clients, our communities, our industry, our families, and our friends. For our UX team, whose job it is to advocate for users,